This blog has moved to: http://www.hostandserve.com
One of the most important rooms for a host is the kitchen.
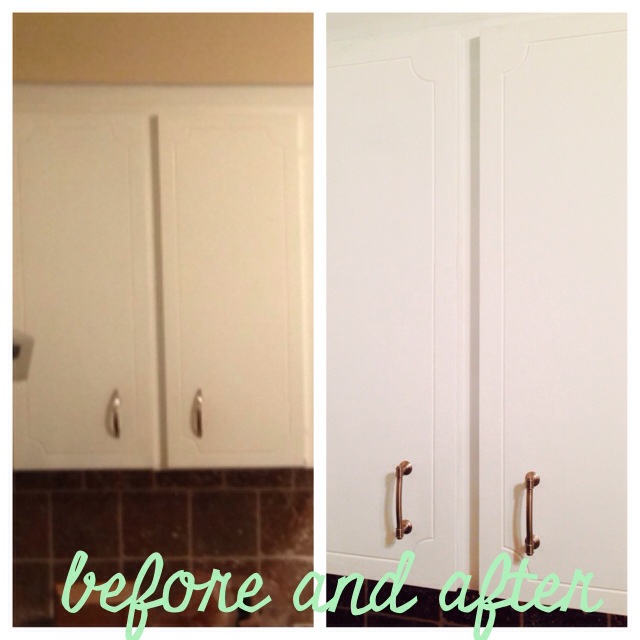
I wish my “before” pictures were clearer, but there is a lot I wish were different about the process of this project. This was the first project we tackled at our new home, and it was the hardest. Well, maybe that fan we installed in the living room was just as hard. I know I cried during both projects, and Matt asked, “Should we just hire someone?”
It would not be the only time he was to ask me that question.
First, get a defined vision for your kitchen. Look at books, blogs, and pinterest to decide what you like. Look at a picture of a kitchen and write down what it is about that kitchen that appeals to you. Look at A LOT of kitchens and look at the common denominators between all your “likes.” Then, copy it! P.S. That is pretty much the secret to styling; find something you like and make it your own.
I realized I liked the “all white farm kitchen” look, but I also liked a bit of color. We decided to incorporate color in a glass tiled backsplash, and keep the rest of it white and simple. I wanted my kitchen to feel bigger so I picked a white “arctic granite” countertop to pair with what would be my newly painted white cabinets. I don’t like “busy” countertops, so the one I picked looks more like quartz than granite. I also didn’t want everything to be so shiny that I was blinded, so a flat (matte) bright white paint was picked.
The DIY blogs I read, the YouTube videos I watched, made this project seem easy. It was not easy. But, believe me, anyone can do it. I just wasn’t mentally prepared for the challenge. So, tackle your cabinets knowing:
1. It will take longer than one day to complete. I thought one Saturday would be long enough. It was not. 🙂 2. Your arm will get a great workout if you sand everything by hand. 3. Prepare a large “working” space for all the drawers and doors to dry in between “treatments.”
4. It will be so much cheaper than hiring a professional!
After a lot of research, blog reading, and trips to Home Depot here is what we used:
- Products that Worked for us: KILZ primer, Glidden Exterior Paint in Bright White, Liberty Brushed Satin Nickel drawer pull, Liberty 3 in. Nautical pull in brushed satin nickel
- Directions we followed: Steps to Painting Kitchen Cabinets
Having parties and serving others can be such a joy for the host, especially if they love room they are working in. And, I just love my twist on a “farm kitchen.”

Matt taking down, and labeling, the cabinet doors.

Our materials from Home Depot; we did not use the poly spray! I decided that would be too hard, and that we did not really need it since we were using exterior paint.

The most important step is sanding. Get the door as smooth as possible and fill in any holes or scratches.